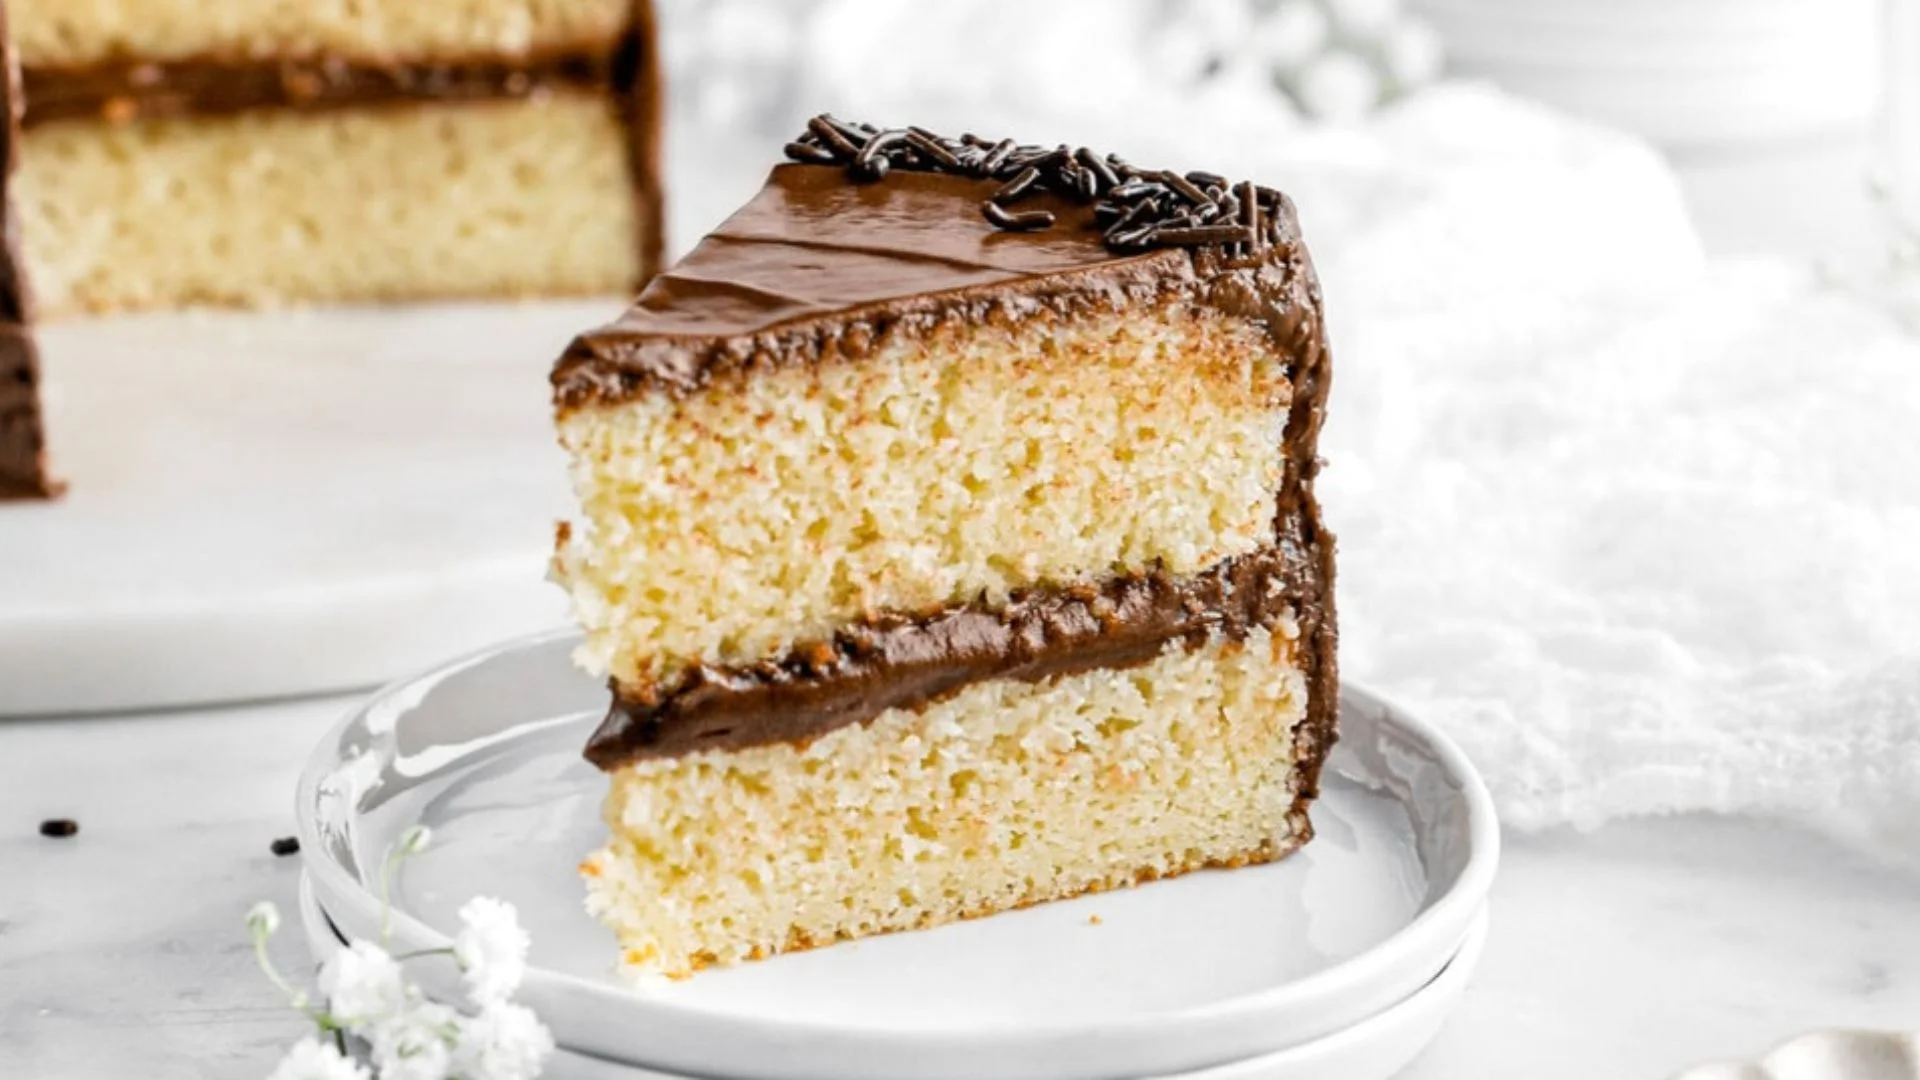
Vanilla cake with chocolate ganache is a soft two-layer cake finished under a glossy coat of dark chocolate. The tender vanilla crumb, creamy topping, and rich cocoa taste make every slice look tempting on the dessert table.
While making this vanilla cake with chocolate ganache, I found that uneven batter between the two pans and overbaking could affect the final texture, so I measured carefully and watched the cakes closely near the end.
The ingredients are affordable and easy to find at home. I also discovered that warm ganache can slide off the cake, so cooling it briefly gives a much cleaner finish. The whole process takes about one hour.
About This Recipe
This vanilla cake with chocolate ganache creates two tender cake layers baked in 8-inch round pans and finished under a smooth chocolate topping.
The crumb stays moist, soft, and lightly buttery, while buttermilk gives the inside a delicate texture. Dark chocolate adds a deeper cocoa note that balances the sweetness of the cake.
I enjoy serving the slices after the topping has cooled and set slightly, since the layers hold together better. The ingredients remain familiar and affordable, making this a practical choice for home baking.
The finished vanilla cake with chocolate ganache has a homemade appearance yet looks polished enough for birthdays, gatherings, or weekend desserts.

Recipe Overview
Preparation Time: 25 minutes
Cooking Time: 35 minutes
Total Time: 1 hour
Course: Dessert
Cuisine: American
Cooking Style: Baking
Recipe Type: Layer Cake
Main Ingredient: All-purpose flour
Best Served: Chilled or at room temperature
Recipe Yield: 12 slices
Serving Size: 1 slice
Main Kitchen Utensils
- Two 8-inch round baking pans
- Two large mixing bowls
- Electric mixer
- Measuring cups and spoons
- Whisk
- Rubber spatula
- Saucepan
- Cooling rack
- Cake spatula
- Parchment paper
Ingredients
For the Vanilla Cake
- 3 cups + 2 tablespoons all-purpose flour
- ½ cup unsalted butter, softened
- 1¼ cups buttermilk
- ½ cup avocado, canola, or vegetable oil
- 1½ cups granulated sugar
- 4 large eggs, room temperature
- 1 tablespoon baking powder
- ½ teaspoon salt
- 1 tablespoon vanilla extract
For the Chocolate Ganache
- 6 tablespoons + 1 teaspoon unsalted butter
- 8 ounces dark chocolate, chopped
- 1¼ cups heavy cream
- 1¼ cups granulated sugar
- 2 teaspoons vanilla extract
- A small pinch of salt
Instructions
Step 1
I start by preheating the oven to 350°F (175°C). Grease two 8-inch round cake pans and line the bottoms with parchment paper. Lightly grease the parchment so the baked layers release easily.
Step 2
Sift the flour and baking powder into a bowl, then add the salt. Give everything a quick whisk and set the bowl aside.
Step 3
Add the softened butter and sugar to a large mixing bowl. Beat for 2–3 minutes until creamy. Add the eggs one at a time, mixing after each addition. Stir in the vanilla extract just until combined.
Step 4
Pour in the oil and mix until blended. Add the dry ingredients in three portions, alternating each addition with buttermilk. Start and finish with the dry ingredients. Mix only until the batter looks smooth. Overmixing can leave the cake dense.
Step 5
Divide the batter evenly between the two prepared pans. Gently smooth the tops with a spatula. Tap each pan lightly on the counter to help release larger air bubbles.
Step 6
Place both pans in the preheated oven and bake for 30–35 minutes. Check the centers around the 30-minute mark using a toothpick. A clean toothpick or one carrying a few moist crumbs means the layers are ready. If the pans sit on separate racks, switch their positions halfway through baking for more even results.
Step 7
Let the cakes cool in their pans for 10–15 minutes, then transfer them to a cooling rack. The layers need to cool completely before the ganache goes on.
Step 9
For the ganache, gently heat the cream and sugar in a saucepan. Remove it from the heat before it reaches a vigorous boil. Pour the hot mixture over the chopped chocolate and leave it for 2 minutes. Stir until smooth, then mix in the butter, vanilla extract, and salt.
Step 9
I place one cooled cake layer on a serving plate and spread ganache over the top. Add the second layer, then cover the top and sides using the remaining ganache. Let the topping firm up slightly before slicing. Cut into 10–12 portions and serve.
Nutrition Facts Of Vanilla Cake With Chocolate Ganache
| Calories | 520 calories |
| Carbohydrates | 67 grams |
| Sugar | 43 grams |
| Protein | 7 grams |
| Total Fat | 26 grams |
| Saturated Fat | 14 grams |
| Cholesterol | 90 mg |
| Sodium | 210 mg |
| Fiber | 3 grams |
How It Works
The cake gets its soft texture from the balance of butter, oil, eggs, and buttermilk. Butter adds a light richness, while oil helps the layers stay moist even after cooling. Buttermilk also keeps the crumb tender and gives the batter a smooth consistency.
Adding the flour in stages helps everything blend evenly without overmixing. The two separate pans allow the batter to bake into even layers, which makes assembly easier later.
The warm cream melts the chopped chocolate into a smooth ganache, while butter adds a silky finish. Once the ganache cools slightly, it spreads easily over the cake and sets nicely for slicing.
Why You Will Choose Vanilla Cake With Chocolate Ganache
You will choose this vanilla cake with chocolate ganache when you want a dessert that feels homemade yet looks beautifully finished. The tender vanilla layers give me a dependable base, while the dark chocolate topping adds a richer touch.
I also appreciate how the two layers create a lovely presentation without requiring complicated decorating skills. Familiar ingredients make preparation convenient, and the finished cake can suit birthdays, family gatherings, or a quiet dessert after dinner.
I find the balance between sweetness and cocoa especially enjoyable, making this a vanilla cake with chocolate ganache worth keeping nearby whenever a homemade celebration cake is needed.
Tips For Best Result
1. Bring the eggs and buttermilk to room temperature before mixing. This helps the ingredients blend evenly.
2. Measure the flour carefully, preferably by weight. Excess flour can make the cake dry and heavy.
3. Mix the batter only until the flour disappears. Overmixing can make the layers firm instead of tender.
4. Divide the batter evenly between the two pans. Using a kitchen scale makes both layers similar in size.
5. Keep the oven door closed during the early baking stage. Sudden temperature changes can cause the cake to sink.
6. Allow both layers to cool completely before adding the ganache. A warm cake can make the topping melt and slide.
7. Let the ganache cool until slightly thick before spreading. This helps create an even coating that stays neatly on the cake.
Amazing Serving Ideas
I love serving this vanilla cake with chocolate ganache at room temperature once the chocolate ganache has softened slightly. A handful of fresh strawberries, raspberries, or blueberries adds a bright contrast to the rich topping.
For a special dessert plate, add a small scoop of vanilla ice cream beside each slice and finish it lightly with chocolate shavings.
A cup of hot coffee, black tea, or cold milk also pairs beautifully. For birthdays, I decorate the top with fresh berries and a few simple chocolate curls before bringing the vanilla cake with chocolate ganache to the table.
When To Serve
This vanilla cake with chocolate ganache works well for birthdays, family get-togethers, weekend baking, or a relaxed dessert after dinner.
I also like serving vanilla cake with chocolate ganache when guests come over because the two-layer design makes it look special without needing complicated decoration.
For a cozy afternoon, pair a slice with coffee or tea. Serve vanilla cake with chocolate ganache slightly cool once the ganache has set, or enjoy it at room temperature for a softer texture.
Ways To Make Additions Extra Delicious
➤ Fresh Berries: Add sliced strawberries or fresh raspberries between the layers. Their slight tartness cuts through the sweetness and gives the cake a fresh, juicy element.
➤ Toasted Nuts: Sprinkle toasted pecans, almonds, or walnuts over the ganache. Toasting brings out their natural nuttiness and adds a crisp texture against the soft cake.
➤ Berry Jam: Spread a thin layer of raspberry or strawberry jam between the two cake layers before adding the ganache. It gives the center a fruity note and extra moisture.
➤ Whipped Cream: Serve each slice alongside lightly sweetened whipped cream. The airy texture creates a nice contrast against the dense chocolate topping.
➤ Chocolate Curls: Finish the cake using dark chocolate curls or fine chocolate shavings. They add a decorative touch and give the topping a stronger chocolate presence.
Storage
Once the vanilla cake with chocolate ganache has cooled completely, place it in an airtight cake container or cover the whole cake tightly before storing. Keep it at room temperature for up to 2 days if the kitchen is cool.
If your kitchen is warm, refrigerate the cake to protect the chocolate ganache. Refrigerated slices stay good for about 4–5 days. Place parchment between individual slices if stacking them in a container.
Before eating, remove a slice from the refrigerator and let it sit for about 20–30 minutes so the vanilla cake with chocolate ganache softens and the ganache loses its firmness.
Frequently Asked Questions
Why did my cake layers sink in the center?
The oven door may have opened too early, or the cake may have needed more baking time. Check the center with a toothpick before removing the pans.
How can I keep the two layers even?
Divide the batter by weight between the two pans. This gives both layers a similar thickness and helps them finish baking at nearly the same time.
Can I use milk chocolate instead of dark chocolate?
Yes. Milk chocolate creates a sweeter, milder topping. Reduce the added sugar if the chocolate already contains a high amount of sweetness.
Why is my ganache too runny?
The mixture may still be too warm. Let it cool for several minutes, stirring occasionally, until it becomes thick enough to spread.
Can I freeze the finished cake?
Yes. Freeze individual portions in airtight wrapping for up to 2 months. Place them in the refrigerator until firm, then allow them to soften before serving.
Conclusion
This vanilla cake with chocolate ganache reminded me how much I enjoy turning familiar pantry ingredients into something worth sharing. I especially loved seeing the two layers come together under the dark chocolate topping after all the baking was finished.
The first slice gave me the soft center and neat layers I was hoping for, which made the extra care feel worthwhile. I would happily make this vanilla cake with chocolate ganache again when I want a homemade dessert that looks inviting on the table.
A little patience during cooling and finishing makes a noticeable difference, and those small details are what I appreciate most about this vanilla cake with chocolate ganache.
More Delicious Vanilla Cakes
Simple Depression Vanilla Cake Recipe
Traditional Vanilla Mayonnaise Cake
Orange Vanilla Cake – Deliciously Bright
Best Almond Vanilla Cake Recipe
The Best Buttermilk Vanilla Pound Cake Recipe

Vanilla Cake with Chocolate Ganache

Equipment
- Two 8-inch round baking pans
- Two large mixing bowls
- electric mixer,
- Measuring cups and spoons
- Whisk
- Rubber spatula
- Saucepan
- Cooling rack
- Cake spatula
- parchment paper,
Ingredients
For the Vanilla Cake
- 3 cups + 2 tablespoons all-purpose flour
- ½ cup unsalted butter softened
- 1¼ cups buttermilk
- ½ cup avocado canola, or vegetable oil
- 1½ cups granulated sugar
- 4 large eggs room temperature
- 1 tablespoon baking powder
- ½ teaspoon salt
- 1 tablespoon vanilla extract
For the Chocolate Ganache
- 6 tablespoons + 1 teaspoon unsalted butter
- 8 ounces dark chocolate chopped
- 1¼ cups heavy cream
- 1¼ cups granulated sugar
- 2 teaspoons vanilla extract
- A small pinch of salt
Instructions
Step 1
- I start by preheating the oven to 350°F (175°C). Grease two 8-inch round cake pans and line the bottoms with parchment paper. Lightly grease the parchment so the baked layers release easily.
Step 2
- Sift the flour and baking powder into a bowl, then add the salt. Give everything a quick whisk and set the bowl aside.
Step 3
- Add the softened butter and sugar to a large mixing bowl. Beat for 2–3 minutes until creamy. Add the eggs one at a time, mixing after each addition. Stir in the vanilla extract just until combined.
Step 4
- Pour in the oil and mix until blended. Add the dry ingredients in three portions, alternating each addition with buttermilk. Start and finish with the dry ingredients. Mix only until the batter looks smooth. Overmixing can leave the cake dense.
Step 5
- Divide the batter evenly between the two prepared pans. Gently smooth the tops with a spatula. Tap each pan lightly on the counter to help release larger air bubbles.
Step 6
- Place both pans in the preheated oven and bake for 30–35 minutes. Check the centers around the 30-minute mark using a toothpick. A clean toothpick or one carrying a few moist crumbs means the layers are ready. If the pans sit on separate racks, switch their positions halfway through baking for more even results.
Step 7
- Let the cakes cool in their pans for 10–15 minutes, then transfer them to a cooling rack. The layers need to cool completely before the ganache goes on.
Step 9
- For the ganache, gently heat the cream and sugar in a saucepan. Remove it from the heat before it reaches a vigorous boil. Pour the hot mixture over the chopped chocolate and leave it for 2 minutes. Stir until smooth, then mix in the butter, vanilla extract, and salt.
Step 9
- I place one cooled cake layer on a serving plate and spread ganache over the top. Add the second layer, then cover the top and sides using the remaining ganache. Let the topping firm up slightly before slicing. Cut into 10–12 portions and serve.
Hello and welcome to All Recipe Make! I’m Julia, the creator behind this food and lifestyle blog, and I’m so glad you’re here. With four years of experience developing recipes, I love crafting dishes that are delicious, fun, and nourishing. Here, you’ll discover a wide range of recipes from vegan and gluten-free options to simple, budget-friendly meals. My aim is to help you bring something special to your table without spending a fortune. Thanks for stopping by I hope you enjoy exploring these recipes as much as I enjoy creating and sharing them!